How to Bulk Convert Microsoft Dynamics Knowledge Base Articles to PDF without any third party connectors
Using Power Automate, you can extract articles from Dataverse, convert them to PDF with proper formatting, and save them to OneDrive—all without third-party tools. This native solution is cost-effective and efficient, though it has some limitations like unsupported images and preview-stage actions.

Microsoft Dynamics has a commonly used feature called Knowledge Articles which is built-in throughout the customer service experience. A client of mine recently asked me whether it's possible to bulk export all knowledge articles inside their environment into PDF files. At first glance, it seemed like a trivial task to execute... only to find out that Microsoft did not provide this as an out-of-the-box feature. After some searching on my search engine of choice, I came across a variety of solutions, which all seemed to depend on some kind of third party connector bound to a paywall. After some tinkering, I discovered an effective solution using Power Automate that's completely independent and stays within the Microsoft ecosystem. In this article, I'll share the solution with you alongside some thoughts and limitations.
The objective is as follows
- Extract all published articles from the Dataverse environment.
- Save PDF files to OneDrive automatically.
- Retain formatting such as headers, bold text, and tables.
- The title of an article should be present in the PDF.
- Avoid third-party connectors or additional costs.
Let's look at a knowledge article form
First step to any solution is understanding the situation. In the picture below, a knowledge article form is visible. In this form there are two important elements we should be aware of. Those are both the "Title" and "Content" fields. The title is useful to note since we'll be able to use that as the filename later on. And should be no surprise by now, but the content is what needs to be extracted and converted to PDF-format. 😉
I do want to note that the content in this article doesn't consist out of just plain text but also some formatting; bold texts and tables (and yes, that will become important later).

How is the content saved in Dataverse?
Now that we know what we’re working with in the form, let’s take a look at how this information is stored behind the scenes in Dataverse.
The Title and Content fields from the form correspond to columns in the Dataverse table. What’s interesting here is that the content is stored as HTML. For instance, when you see <div data-wrapper="true"... in the Dataverse table, it’s not raw text—it’s the structured HTML that brings formatting like headings, bold text, and tables to life.
This HTML storage makes it possible for articles to include rich formatting, but it also means we need to parse and handle the HTML carefully to ensure it converts cleanly to PDF. Without proper conversion, you could end up with broken tables or missing formatting in your final document.

How I converted HTML to PDF files
Since we know that the content is saved as HTML, we need to find a way to convert that HTML into a PDF file. Online I found a bunch of third party services that would do this, however, that didn't sit right with me. I wanted to find a way to do this natively within the Microsoft ecosystem, and preferably without incurring any additional costs. That's when I stumbled upon this Onedrive and Sharepoint API endpoint called "Download a file in another format" which allows me to input HTML files and output it to a supported file extension. While writing this article, the following file formats are supported as outlined in the table below:
| Value | Description | Supported source extensions |
|---|---|---|
| glb | Converts the item into GLB format | cool, fbx, obj, ply, stl, 3mf |
| html | Converts the item into HTML format | eml, md, msg |
| jpg | Converts the item into JPG format | 3g2, 3gp, 3gp2, 3gpp, 3mf, ai, arw, asf, avi, bas, bash, bat, bmp, c, cbl, cmd, cool, cpp, cr2, crw, cs, css, csv, cur, dcm, dcm30, dic, dicm, dicom, dng, doc, docx, dwg, eml, epi, eps, epsf, epsi, epub, erf, fbx, fppx, gif, glb, h, hcp, heic, heif, htm, html, ico, icon, java, jfif, jpeg, jpg, js, json, key, log, m2ts, m4a, m4v, markdown, md, mef, mov, movie, mp3, mp4, mp4v, mrw, msg, mts, nef, nrw, numbers, obj, odp, odt, ogg, orf, pages, pano, pdf, pef, php, pict, pl, ply, png, pot, potm, potx, pps, ppsx, ppsxm, ppt, pptm, pptx, ps, ps1, psb, psd, py, raw, rb, rtf, rw1, rw2, sh, sketch, sql, sr2, stl, tif, tiff, ts, txt, vb, webm, wma, wmv, xaml, xbm, xcf, xd, xml, xpm, yaml, yml |
| Converts the item into PDF format | doc, docx, epub, eml, htm, html, md, msg, odp, ods, odt, pps, ppsx, ppt, pptx, rtf, tif, tiff, xls, xlsm, xlsx |
I could've used this endpoint and made a bunch of API requests directly. After a bit of accidental digging... I found out that the OneDrive for business connector inside Power Automate already added this as an action. Jackpot! 😄

Building the Power Automate flow
- List all knowledge articles
Here, I’m using the "List rows" action from the Dataverse connector. I set the table name to Knowledge Articles and added the filter: isrootarticle eq false. This ensures I’m only pulling the relevant articles, similar to the default "All Articles" view in Customer Service.

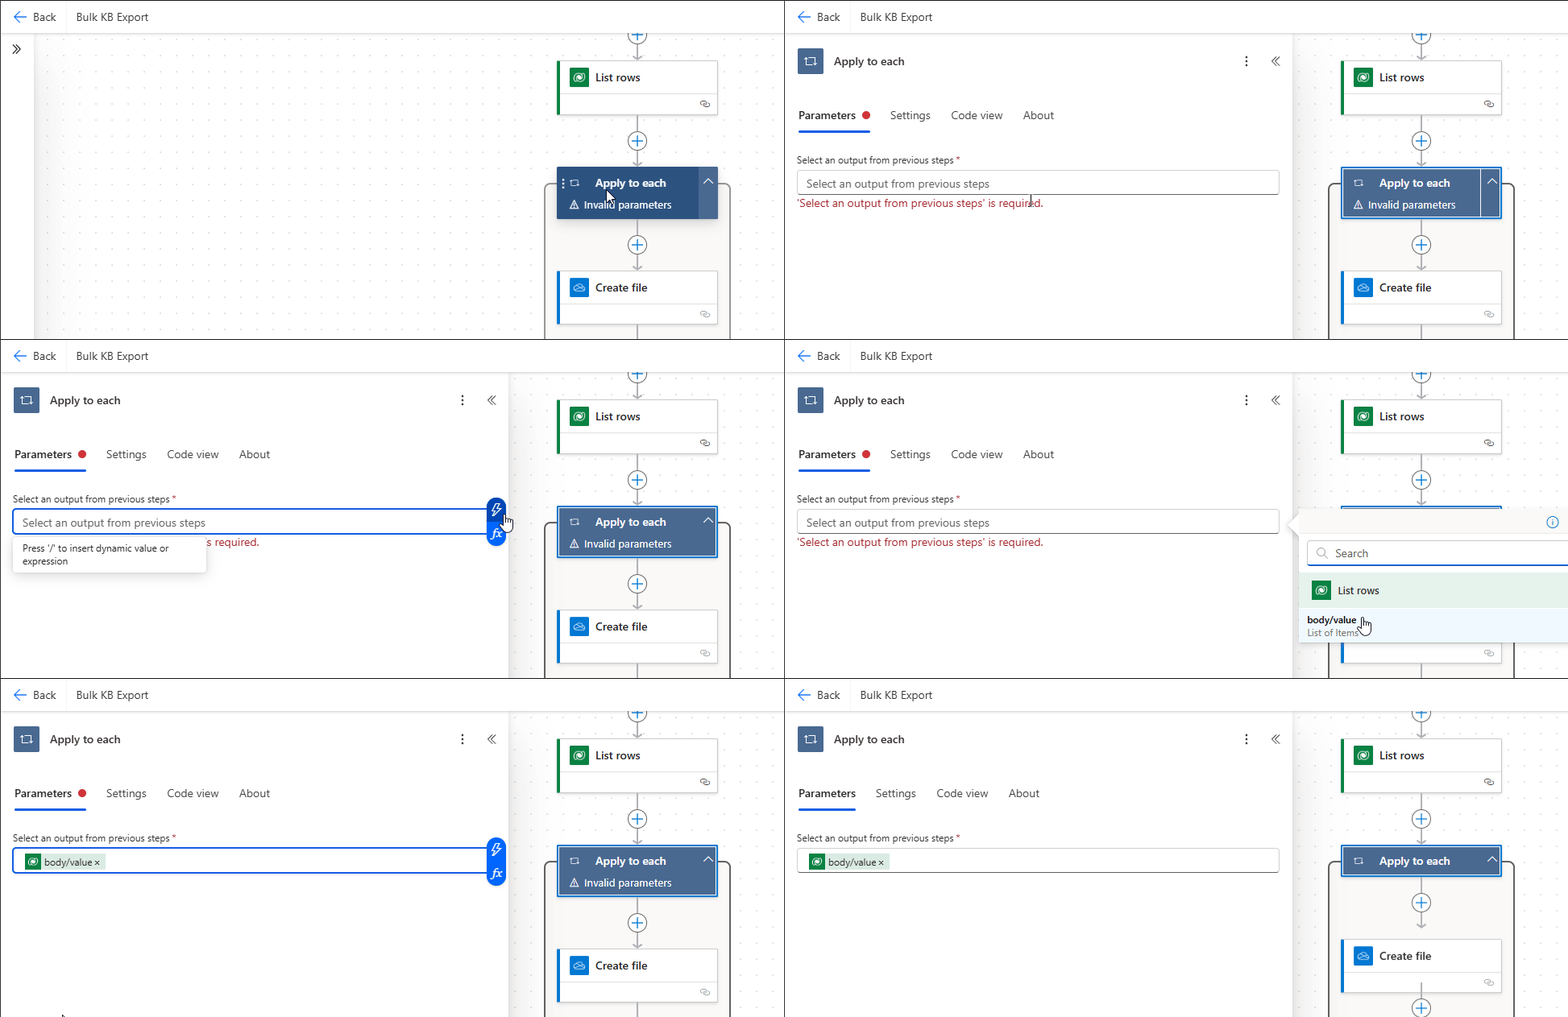
- Next, I use the "Apply to each" action to loop through the rows fetched in the previous step. This allows me to process each Knowledge Article individually.

- Create and save the HTML file
Before converting to PDF, we need to define how to structure the Knowledge Article in the exported file. I want the article title at the top (as a header) and the content below it. For this, I use the "Create file" action from the OneDrive for Business connector (though you could also use SharePoint).
Here’s how I did it:
- Folder Path: Select the location where you want the files to be stored.
- File Name: Use the Article Number and Title to make up a unique filename (e.g.,
KA-12345_Title.html). Make sure the file extension is.html. - File Content:
- Wrap the Title in
<h1>and</h1>tags to make it a heading. - Add a
<hr>tag to create a horizontal line separating the title from the content. - Include the Content field directly, which is already in HTML format.
- Wrap the Title in

- Convert the HTML file to PDF
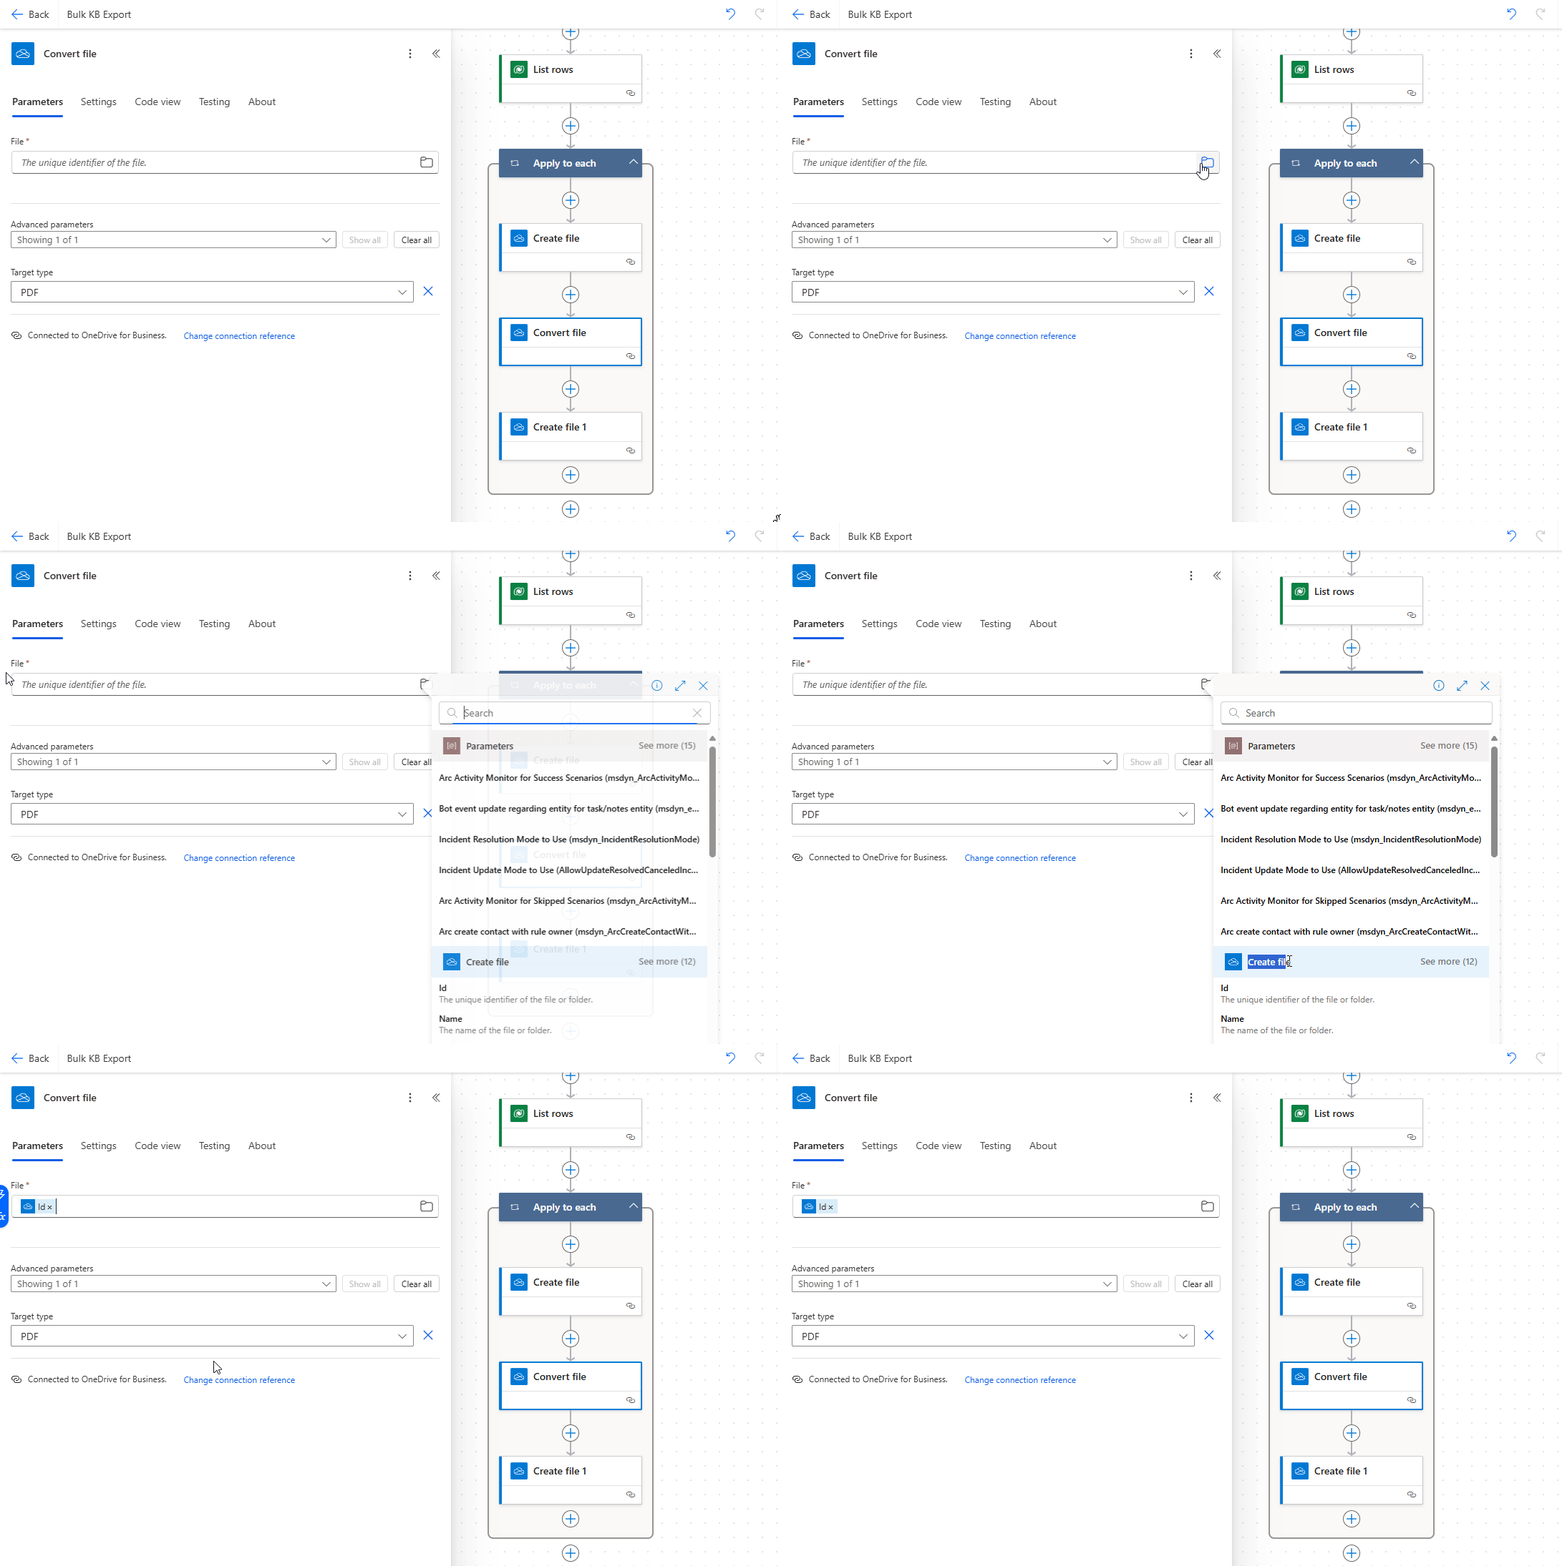
Once the HTML file is created, the next step is to convert it into a PDF. For this, I use the "Convert file" action from the OneDrive for Business connector that I mentioned previously.
Here’s how it’s configured:
- File: Select the file from the previous step (the HTML file created earlier).
- Target type: Set this to PDF to generate the output in PDF format.
This action takes the HTML file, retains its formatting (like headers and tables), and converts it into a neatly structured PDF.

- Save the PDF file
The Convert file action above will take the HTML file created in step 3 and convert it to a PDF file. This output can then be used for whatever your use case is. In my case, I want to save it to the "pdf" folder in my onedrive.

- Results

PDF file:

Limitations
It does come with a few limitations that you should be aware of:
- Images Won’t Convert
If your articles contain images which reside inside the dataverse environment, then these images will not be included inside the PDF file. - Large Tables Get Cut Off
If your articles include wide tables, they may overflow or be truncated in the final PDF. This happens because PDFs are rendered in A4 size by default. You can try adding custom CSS with rules liketable { width: 100% !important; }to force tables to fit within the page. You can read what Microsoft says about Known Issues with HTML to PDF conversions here. - The "Convert File" Action is in Preview
At the time of writing, the OneDrive connector’s "Convert file" action is still in preview. While it works well for most scenarios, it’s not guaranteed to be production-ready. If you’re building a business-critical solution, consider using the official API endpoint directly for more reliability.
Final Thoughts
After piecing everything together, I’m happy to say that this solution checks most of the boxes: it’s completely native to the Microsoft ecosystem, cost-effective (no third-party tools required), and reliable for general use. Sure, this solution has some limitations but depending on your use case, this might just be what you're looking for.
With that out of the way, thank you for reading all the way through. It's been fun sharing my insights and truly hope you found this article useful. If you have any questions or tips, please feel free to leave a comment below this post.
